はじめに
こんにちは。
めちゃめちゃ時間空きましたが、進めていきます。

Nuxt.jsビギナーズガイド―Vue.js ベースのフレームワークによるシングルページアプリケーション開発
- 作者: 花谷拓磨
- 出版社/メーカー: シーアンドアール研究所
- 発売日: 2018/10/17
- メディア: 単行本(ソフトカバー)
- この商品を含むブログを見る
今回は、3章を勉強しました。
やってみた
1. ライフサイクル
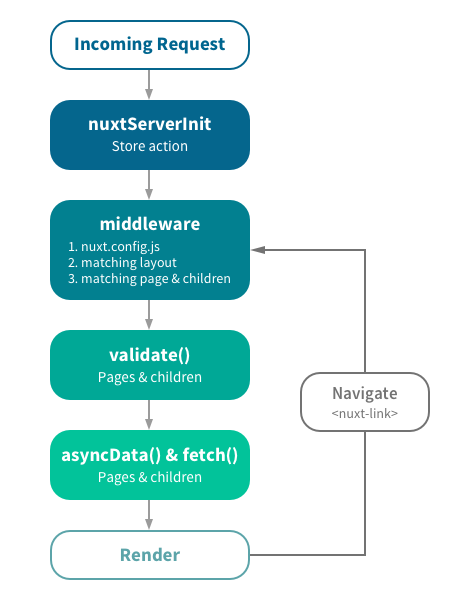
nuxtにはvueのライフサイクル以外に、nuxtのライフサイクルが存在します。
nuxtのライフサイクルが終わったあと、vueのライフサイクルが実行されます。

nuxtServerInit
- ストア内にこのアクションが定義されているときに自動で呼び出される。
- ライフサイクル的に一番最初に来るので、ユーザー認証のデータ保存や、必ずセットしたいデータがある時などで使用できる。
middleware
- ページコンポーネント内で、middlewareが定義されている際に呼び出される。
- 他に依存がない専門的な機能などを提供する。(認証がとっていなければリダイレクトするなど?)
validate()
- ページコンポネント内で、validateが定義されている際に呼び出される。
- 動的ルーティングのバリデーション処理として使用される。
asyncData() & fetch()
- ライフサイクルの一番最後に実行される。
- asyncData()とfetch()の違いは、fetch()はコンポーネントのdataへのセットが行われない
2. middlewareの使い方
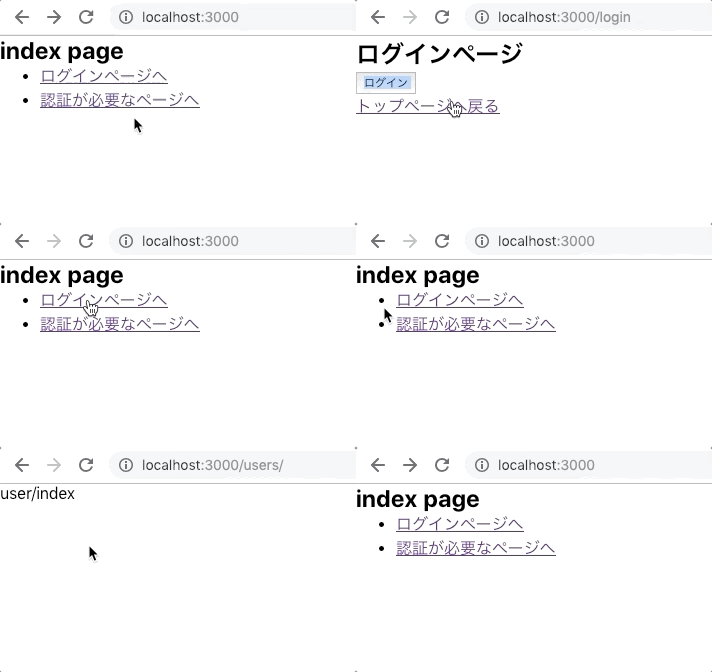
本書では、ミドルウェアの使用方法の紹介として、認証を実装しています。
今回は本書と同じ構成を真似してみました。
| エンドポイント | 認証の振り分け |
|---|---|
| http://localhost:3000/ | 誰でもアクセス可能 |
| http://localhost:3000/login | 未ログインユーザーのみアクセス可能。既ログインユーザーは「/」へ移動 |
| http://localhost:3000/users | 既ログインユーザーのみアクセス可能。未ログインユーザーは「/login」へ移動 |
1. 認証が必要なページ(/users)
<template>
  <div>
    <p> user/index </p>
  </div>
</template>

<script>
export default {
  middleware: 'auth'
}
</script>
2. ログインページ(/login)
<template>
  <div>
    <h2>ログインページ</h2>
    <p>
      <button
        type="button"
        @click="login">ログイン</button><br >
      <nuxt-link to="/">トップページへ戻る</nuxt-link>
    </p>
  </div>
</template>

<script>
import Cookies from 'universal-cookie'
export default {
  middleware: 'auth',
  methods: {
    login() {
      const cookies = new Cookies()
      cookies.set('credential', 'true', { maxAge: 90 })
      this.$router.push('/')
    }
  }
}
</script>
3. indexページ(/)
<template>
  <div>
    <h2>index page</h2>
    <ul>
      <li>
        <nuxt-link to="/login">ログインページへ</nuxt-link>
      </li>
      <li>
        <nuxt-link to="/users/">認証が必要なページへ</nuxt-link>
      </li>
    </ul>
  </div>
</template>
4. 認証ミドルウェアjs(auth.js)
import Cookies from 'universal-cookie'

export default ({ req, route, redirect }) => {
  if (['/'].includes(route.path)) {
    return
  }

  const cookies = req ? new Cookies(req.headers.cookie) : new Cookies()
  const credential = cookies.get('credential')
  if (credential && route.path === '/login') {
    return redirect('/')
  }

  if (!credential && route.path !== '/login') {
    return redirect('/login')
  }
}

ルーティングに処理を差し込むことができ、状態によってredirectさせることが出来ました。
便利に見えるミドルウェアですが、本書でも注意点として書かれておりますが、柔軟な機能が作成できる反面、責務をまたぐコードが作成される可能性があります。
便利な反面、使い所は気をつけたほうが良さそうです。
3. pluginの使い方
本書では、VueRouterのbeforeEachフックを利用して、ページ遷移が行われるたびにルーティングのパスを記録するlogger.jsプラグインを実装しています。
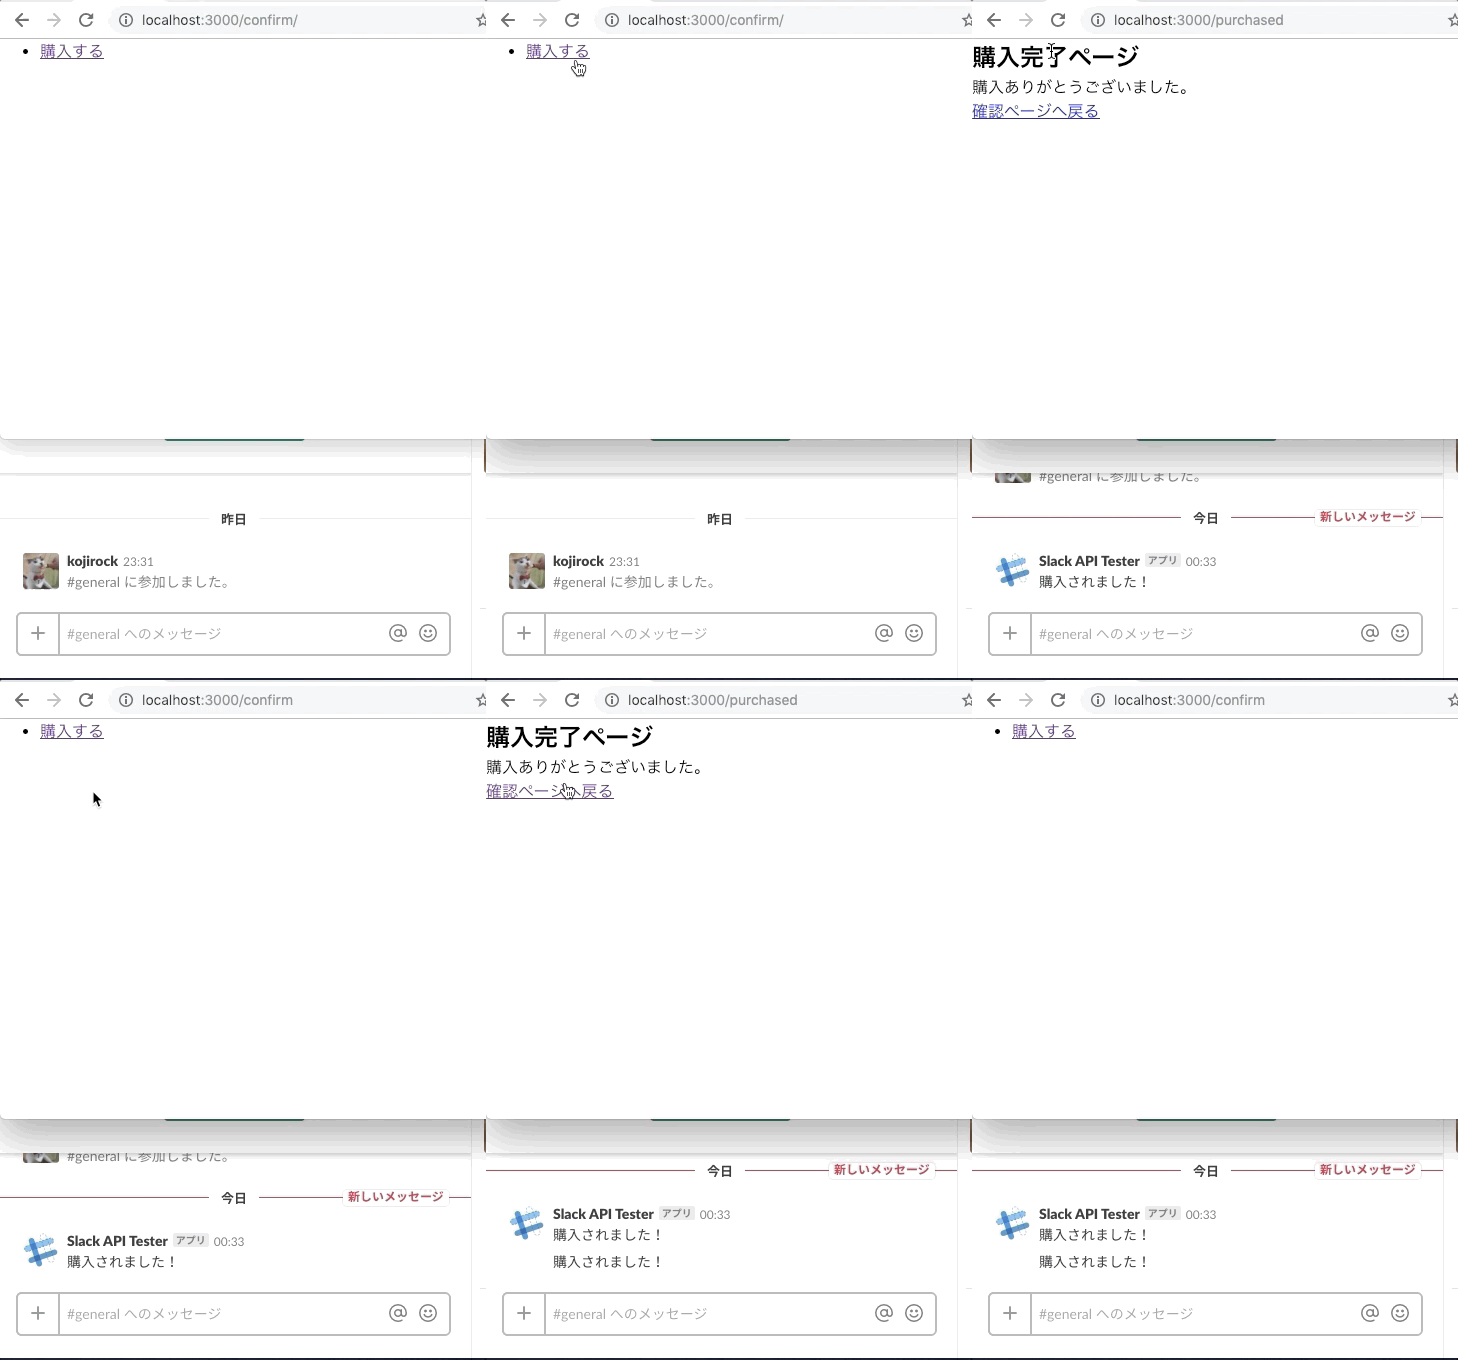
今回は本書の説明を見ながら、あるルートにきた際に、slackへ通知するようなpluginを作ってみようと思います。
1. ライブラリインストール(slack-notify)
$ yarn add slack
2. .envrcでslack tokenを追加
export SLACK_TOKEN="xxxxxxxxxxxxxxxxxxxxxxx"
3. .envrc読み込み
direnv allow
direnv: loading .envrc
direnv: export +SLACK_TOKEN
4. nuxt.configのenvプロパティに追加
  env: {
    SLACK_TOKEN: process.env.SLACK_TOKEN
  }
5. plugin追加
import Slack from 'slack'
export default ({ app, env }) => {
  app.router.beforeEach((to, from, next) => {
    if (to.fullPath === '/purchased') {
      const slack = new Slack()
      slack.chat.postMessage(
        {
          token: process.env.SLACK_TOKEN,
          channel: 'general',
          text: '購入されました!'
        },
        () => {
          next()
        }
      )
    } else {
      next()
    }
  })
}
6. 確認ページ
<template>
  <div>
    <ul>
      <li>
        <nuxt-link to="/purchased">購入する</nuxt-link>
      </li>
    </ul>
  </div>
</template>
7. 購入完了ページ
<template>
  <div>
    <h2>購入完了ページ</h2>
    <p>購入ありがとうございました。</p>
  </div>
</template>

できましたー!
実際には、もっと粒度の細かい使い方がpluginだと思いますが、今回は本書のrouterフックを勉強するために作ってみました。
4. Vuexモジュールモードの使い方
以前使用していたクラシックモードでは、以下のようにVuexをコード内で読み出してストアを作成していました。
import Vuex from 'vuex'

export default () =>
  new Vuex.Store({
    state: {
      weatherData: ''
    },

    getters: {
      weatherData: state => state.weatherData
    },

    mutations: {
      setWeatherData(state, weatherData) {
        state.weatherData = weatherData
      }
    },

    actions: {
      async fetchWeatherData({ commit }, { pref }) {
        const url = `https://api.openweathermap.org/data/2.5/weather?q=${pref}&APPID=${
          process.env.OPENWEATHERMAP_API_KEY
        }`
        const response = await this.$axios.$get(url)
        commit('setWeatherData', response.weather[0].main)
      }
    }
  })
モジュールモードでは、こちらのような書き方になります。
export const state = () => ({
  weatherData: ''
})
export const getters = {
  weatherData: state => state.weatherData
}
export const mutations = {
  setWeatherData(state, weatherData) {
    state.weatherData = weatherData
  }
}
export const actions = {
  async fetchWeatherData({ commit }, { pref }) {
    const url = `https://api.openweathermap.org/data/2.5/weather?q=${pref}&APPID=${
      process.env.OPENWEATHERMAP_API_KEY
    }`
    const response = await this.$axios.$get(url)
    commit('setWeatherData', response.weather[0].main)
  }
}
ロジックのみ抜き出しているような形です。
終わりに
アドベントカレンダーからだいぶ時間空きましたが、やっと勉強テンションになってきたので、今からまたやってきます!
お疲れ様でした。